Pages

Showing posts with label Recycle. Show all posts

Tuesday, March 22, 2016

How to make T-Shirt Yarn


Have you seen those fettuccini or zpaghetti yarns?  Have you seen their prices? Wow! All they are are just jersey fabric cut into strips.  Jersey fabric = t-shirts!  So if you have t-shirts you are no longer using, here's a great way to recycle them!  Make them into t-shirt yarns to knit or crochet with.  How much fun will that be!  All the things you can create!!

Here is a link to a fantastic tutorial on how to make t-shirt yarn by MaDonna Sheehy from Shirts.com.  http://www.shirts.com/blog/p-487-DIY-t-shirt-yarn.aspx

Crocheting With T-Shirt Yarn
Picture by Shirts.com

So now off you go and cut up those t-shirts!  Share with me what you make.  I'd love to see it!

Peechee


Tuesday, July 30, 2013

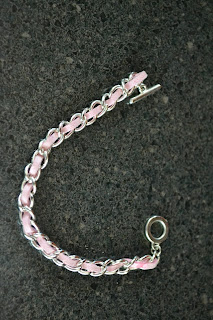
Plastic Bottle to Flower Charm Bracelet

For a while, I have heard of slightly melting plastic soda bottles into different forms.  I've been wanting to try it for a while but I don't drink sodas.  Well, I recently attended a family party where they had 2 liter plastic bottles.  When I saw they were empty, I grabbed 2 of them and threw it in the car so I could make this ...


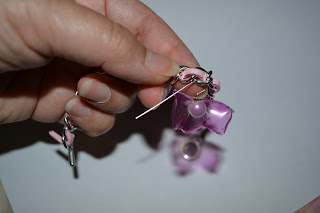
Those charms that you see (the clear and the pink ones) are made from the soda bottles I took from the party.  *snicker*  Here's how I made them.  WARNING:  This is pretty picture heavy ...

 The bottles I took.  Shhh!!!
 Washed the bottles and remove the label.
Inserted (stabbed) a sharp knife through the top of the plastic bottle.  I am fortunate to have a cutco knife which are like super sharp.  Just be careful when doing this part.
 Now continued to slice the plastic bottle in order to remove the top.  When you have a big enough space, you could switch to scissors for safety.  Again, my cutco is so sharp, I just kept right on going.
 Here's the top removed.
Using scissors, I cut up the side where the seam is on the bottle .  Cut all the way up and then around the bottom part of the bottle to separate it.
 Here's what it should look like once you cut everything apart.
Now I grabbed my sizzix flower charms die to cut out some ... of course ... flower charms. NOTE:  If you don't have a sizzix, you can still make the charms.  Keep reading on.  I'll reveal down below.
 Here's what the die looks like.
A cut a piece of the large plastic to fit the size of the die.
 Sandwiched it in and ran it through my sizzix.
 Here is what it looks like after I took it out of the machine.  See those the large blank space?  What a waste!  I could have used that!  Ugh!
Popped it out and here's the pieces.
 OK.  That empty space that I could have used really bothered me. I hate wasting things.  So using the plastic pieces I already popped out, I placed it under the other plastic sheet and used them as a template to make more flowers.  See how much more flowers I can have.  No wasting space.  This is where for those of you who don't have a sizzix can do.  Just freehand some flower shapes and cut it out.
I wanted to try something different and so I colored one of them in, just to see what happens.
 I then cut them out.
Now I grabbed a tweezer, a tealight, and a lighter.  This is for the shaping part of the plastic.
 Held one end of the plastic flower with the tweezer and carefully held it ABOVE the flame.  Do NOT put it right into the flame.  The heat that rises from the flame will be enough to melt the plastic flower.  You have to move it in and out of the heat and you'll see the plastic curl.  There's really no control over which way it will curl but that's the beauty of it (for me, at least).
 Here's the pink one curling.  It looks like it's on fire but that's just the reflection.
 Here they are all curled and not anyone looking the same.
I then took a needle and heated the tip of it and quickly inserted it into the middle of the plastic charm.  This is to put a hole to feed the head pin into to hang from the bracelet.
 When the needle is heated enough, it will push right through the plastic charm so easily - like butter.
 Here's the hole.
Here are the charms all with holes now.
 I then grabbed a bracelet that I already had so I could add the plastic flower charms to it.
This is me showing off my bead pearl stash.  :-)  But I did use the white pearls.
I grabbed some headpins to feed through the pearls and my jewelry tools to bend the headpins.
Fed the headpin through the pearl bead and then through the plastic flower charm.
 Using the jewelry tool, bended the headpin to make like a loop.
Inserted it into one of the links on the bracelet and wrapped it around itself and closed off the ends.
 Here it is with all of them attached to the bracelet.
 Another picture of me wearing it.
The back side.

So what do you think?

I'm definitely liking it.  Next time, I'm free handing the flowers giving them larger petals but smaller overall size and I plan on coloring them as well.  Hmmm... I think I"m going to need some earrings to match this.  Maybe a ring too.

Peechee

I'm partying this over here ...

Manic Monday      Pin It Monday     Keeping It Simple    Craftastic Monday   Craft-O-Maniac Monday    Mad Skills   Making the World Cuter    Made by You Monday   Make the Scene Monday     Take a Look Tuesday    The Inspiration Exchange   Homemade by You     Wow Me Wednesday      Lil Luna Link Party   Wednesday Whatsits  Whatever Goes Wednesday    Pinterest Power Party   Sugar and Spice   Pity Party Friday   


Saturday, July 20, 2013

Bolero Shrug from a T-Shirt

Recently, I came across a recycled/upcycled project from Aunt Peaches site.  She made a No-Sew Bolero Shrug out of a simple long sleeve T-Shirt.  It looked easy enough and cute enough, that I just had to try it out.  So I ran to the thrift store, picked out an XL long sleeve T-Shirt, washed it, and proceeded to craft it up.  Here's what it looked like when done ...

T-Shirt Jacket Shrug

And here's how I did it ...

Long sleeve t-shirt. I bought a size XL as per the suggestion of Aunt Peaches.  My size is actually M.
Cut off the bottom of the shirt as well a small part of the arms of the sleeve.  You just want to cut off the stitched portions.
Might be a bit hard to see but I cut straight up the middle of the front part of the shirt. Don't cut through the back of the shirt.
I then came down part of the way from the top of the shirt and cut it at an angle and all the way around the neck part back to the front.  Almost like I was trying to make the shirt into a v-neck since it was circular.

Here's a closer picture of the cut.

Now, turn it and put it on upside down.  Yes, you heard me right ... upside down.  The bulkiness of what is the bottom of the t-shirt will drape around your neck to give you that scrunchy look.

Here's what it looks like from the back.  HINT: Be sure to cut with sharp scissors and cut straight or you'll see a jaggedy cut.

The front again!

FINAL NOTE:  I did find it a bit annoying that part of the scrunched up part kept wanting to fall off the sides of my shoulders.  I had to keep pulling it off my shoulders and onto my neck.  Thinking I might have to do a little sewing to manipulate it to stay in place.  That or maybe I need a smaller shirt.  Anyhoo ... it is cute when it stays in place.


I'm partying this over here ...

Manic Monday        Pin It Monday      Motivate Me Monday       Handmade Tuesdays      Tuesday's Treasures       Nifty Thrifty Tuesday     A Peek into my Paradise     Off the Hook Party        Lil Luna Linky      We Did It Wednesday     The Weekly Creative Thursday      

Friday, May 10, 2013

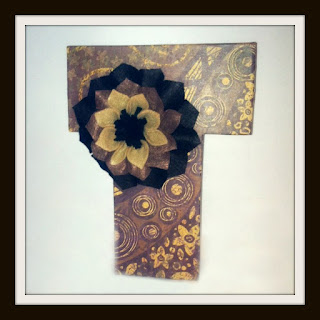
3D Monogram from Cereal Box with Felt Dahlia

I've always been wanting to try this after seeing it floating around pinterest.

Recycled Monogram with Felt Dahlia by Peechee


Being laid up due to an ankle injury, I figured this would be a good time to try.  So here it goes.  WARNING:  This post is pretty picture heavy ....

First gather your cereal box, scissors, and desired letter.  I printed out a letter on a 8.5x11 paper.  NOTE:  I found that the cereal boxes bought from bulk stores (Costco, Sam's, BJ's) are the best to use as they are much sturdier.  The ones from regular grocery stores are just too flimsy.  The boxes have to have some weight to them to hold up.


 Trace the letter you want on the front or back part of the box.  The biggest area of the box.

 Cut out the letter.

 Trace and cut out another letter.


 Using the sides of the cereal box, measure and tag every 1.5".

Make lines on the tagged measurement and cut out.  This will be the sides of the monogram.

 Here are the cut out pieces.

 Using a hot glue gun, strart gluing the sides to the monogram letter.  You will have to measure out where the bends will be and score it for easy bending.

 Here are the sides glued on all around the monogram letter.

 Another view.

 Now match and glue the second monogram letter onto the sides.

Here's the 3d monogram letter ready to decorate.

These are the 12x12 scrapbook paper I decided to use to decorate the monogram.

 Glue on the paper to the monogram and cut out the sides to fold over and glue.

 Glue the sides down.

 Now glue on the second paper to the other side of the monogram.

 Glue down the sides.

 Just like before, cut out "side" covers from scrapbook paper.

 Glue it around the sides.  Here's one side

 Here's another and done.  Time for the flower.

 Cut out 3 different size squares ... 2", 1.75", and 1.5"

 Here's the 2".  Fold in half and cut out a petal like shape.  Freehand is fine - just make sure there's a bottom part that is flat for the stem part, a bump out from there, and then a pointy tip at the top.

 Unfold it and here's the petal.

 Make a petal from each square - this will be your template which you will use to cut out on felt.

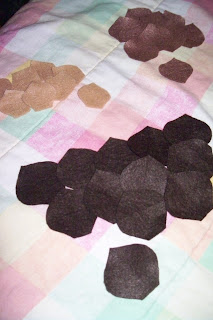
 Here they are all cut out.  I used 3 varying brown colors, as you can see.  For the 2" petal, cut out 12 pieces.  The 1.75" petal, cut out 10 pieces.  The 1.5" petal, cut out 8 pieces.

 Now cut out a felt circle size 3".  This will be your backing to the flower.
(sorry flash blew out the picture - one is the felt, the other is a paper template I used)

 Now take 1 petal and apply glue to the bottom part of it (the one with the straight edge) and curl the ends into the glue.  The petal should be cup-like.

 Do this for all the petals.

 Now glue the petals around the edge of the circle felt.  Before I glued mine down, I first arranged them on the circle to make sure they fit nicely together.  Then one by one, picked each petal up and glued it down to where I had placed it.

Here's the rest of the petals - the 1.75" and the 1.5"

 Again, arrange the 1.75" petals inside of the 2" petals then glue them down. 

 Do the same for the next set of petals (the 1.5" size).

 Cut a strip of felt 1" by 9" and cut slits along the strip.  I made my slits cut down to about 3/4 of the way.  Don't cut all the way through - just slits.

Then roll up one edge of the strip and keep rolling.  Keep the uncut part of the strip even.

 Once rolled, apply glue and stick it in the center of the flower between all the petals.

 Fluff it out and here's what it should look like.

 Glue onto the monogram and...

Tah-dah!

So there it is.  Not too hard, just time consuming but fun to do.  I think it looks good just the way it is but if you wanted to seal it, you could apply modge podge all over the entire thing.  I just don't like the strokes the modge podge sometimes leaves on things, so I opted not to do it with this.  It's just going to be sitting on a shelf, so I don't expect it to get any wear and tear.

I'm partying this post over at: