Pages

Friday, May 10, 2013

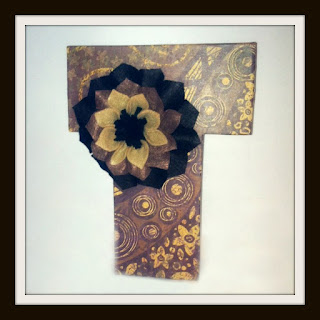
3D Monogram from Cereal Box with Felt Dahlia

I've always been wanting to try this after seeing it floating around pinterest.

Recycled Monogram with Felt Dahlia by Peechee


Being laid up due to an ankle injury, I figured this would be a good time to try.  So here it goes.  WARNING:  This post is pretty picture heavy ....

First gather your cereal box, scissors, and desired letter.  I printed out a letter on a 8.5x11 paper.  NOTE:  I found that the cereal boxes bought from bulk stores (Costco, Sam's, BJ's) are the best to use as they are much sturdier.  The ones from regular grocery stores are just too flimsy.  The boxes have to have some weight to them to hold up.


 Trace the letter you want on the front or back part of the box.  The biggest area of the box.

 Cut out the letter.

 Trace and cut out another letter.


 Using the sides of the cereal box, measure and tag every 1.5".

Make lines on the tagged measurement and cut out.  This will be the sides of the monogram.

 Here are the cut out pieces.

 Using a hot glue gun, strart gluing the sides to the monogram letter.  You will have to measure out where the bends will be and score it for easy bending.

 Here are the sides glued on all around the monogram letter.

 Another view.

 Now match and glue the second monogram letter onto the sides.

Here's the 3d monogram letter ready to decorate.

These are the 12x12 scrapbook paper I decided to use to decorate the monogram.

 Glue on the paper to the monogram and cut out the sides to fold over and glue.

 Glue the sides down.

 Now glue on the second paper to the other side of the monogram.

 Glue down the sides.

 Just like before, cut out "side" covers from scrapbook paper.

 Glue it around the sides.  Here's one side

 Here's another and done.  Time for the flower.

 Cut out 3 different size squares ... 2", 1.75", and 1.5"

 Here's the 2".  Fold in half and cut out a petal like shape.  Freehand is fine - just make sure there's a bottom part that is flat for the stem part, a bump out from there, and then a pointy tip at the top.

 Unfold it and here's the petal.

 Make a petal from each square - this will be your template which you will use to cut out on felt.

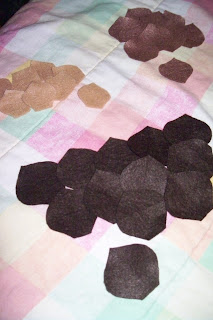
 Here they are all cut out.  I used 3 varying brown colors, as you can see.  For the 2" petal, cut out 12 pieces.  The 1.75" petal, cut out 10 pieces.  The 1.5" petal, cut out 8 pieces.

 Now cut out a felt circle size 3".  This will be your backing to the flower.
(sorry flash blew out the picture - one is the felt, the other is a paper template I used)

 Now take 1 petal and apply glue to the bottom part of it (the one with the straight edge) and curl the ends into the glue.  The petal should be cup-like.

 Do this for all the petals.

 Now glue the petals around the edge of the circle felt.  Before I glued mine down, I first arranged them on the circle to make sure they fit nicely together.  Then one by one, picked each petal up and glued it down to where I had placed it.

Here's the rest of the petals - the 1.75" and the 1.5"

 Again, arrange the 1.75" petals inside of the 2" petals then glue them down. 

 Do the same for the next set of petals (the 1.5" size).

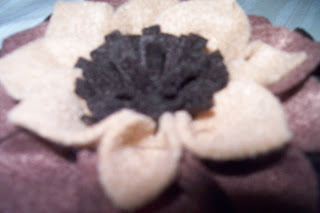
 Cut a strip of felt 1" by 9" and cut slits along the strip.  I made my slits cut down to about 3/4 of the way.  Don't cut all the way through - just slits.

Then roll up one edge of the strip and keep rolling.  Keep the uncut part of the strip even.

 Once rolled, apply glue and stick it in the center of the flower between all the petals.

 Fluff it out and here's what it should look like.

 Glue onto the monogram and...

Tah-dah!

So there it is.  Not too hard, just time consuming but fun to do.  I think it looks good just the way it is but if you wanted to seal it, you could apply modge podge all over the entire thing.  I just don't like the strokes the modge podge sometimes leaves on things, so I opted not to do it with this.  It's just going to be sitting on a shelf, so I don't expect it to get any wear and tear.

I'm partying this post over at:
Thursday, May 9, 2013

Renner Thursday - new haircut

Somebody help me because I think I might be just a little obsessed with Jeremy Renner.  Just a little.

My lil' man needed a haircut badly and I really do like Jer's hair style, so I asked our wonderful hair stylist to cut and style his hair just like Jer's.  What do you think?

Jeremy Renner - Renner Thursday
 
Yeah, yeah.  I just had to pose him in the same manner.  Thought it was cute.  Makes me smile and laugh when I see it.  Aren't they both so cute?

~Peechee

Wednesday, May 8, 2013

Pretzel Brownies

I had a sweet tooth for a chocolate covered pretzel but didn't have any on hand.  However, I did have some pretzel sticks and a brownie mix.  So why not put the two together to make a pretzel brownie.  Hopefully it can curb my chocolate covered pretzel craving.
 

All you need is a bag of pretzel and a box of brownie mix.


 I took about 1/4 of the pretzels and crushed them - not finely but chippy like.  I then spread the chippy/crushed pretzels in the pan (which has been sprayed with oil).  I fixed the brownie mix as directed on the box and when done mixing poured the mix right on top of the pretzels.


Bake as directed and when done, let cool.


Now enjoy!


My brownies were chewy and the pretzels weren't too hard.  It wasn't bad at all.  A nice combo but they weren't chocolate covered pretzels.  So did it satisfy my craving?  Yeah.  I'm not wanting chocolate covered pretzels right now.  However, if someone gave me some, I wouldn't refuse it.  ;-)

Hope you n-joy'd!

I'm partying at:  Lil Luna Linky       Wow Me Wednesday


Monday, May 6, 2013

Ice Cream Sandwich Cake

Did I ever mention that I love Pinterest?  I am a pinterest-a-holic!  I, myself, have about 40 boards with over 7,000 pins. I have pins for lots of different crafts like paper, recycled, jewelry, duct tape, felt, plus more. Then there's boards for recipes, beauty, health and fitness, photography, holiday crafts, geeky things, and of course, a personal page for Jeremy Renner where I have over 700 pictures of just him.  *sigh*

OK (slap back to reality).  I've gone way off topic.  So anyway, while surfing on pinterest, I found a DIY ice cream cake that I thought would be fun to make.  So I did!

Ice Cream Sandwich Cake
 
It's an ice cream sandwich cake and all you need are:

12 bars of ice cream sandwiches
whip cream in a tub
Magic Shell chocolate
Magic Shell caramel
crushed oreos

 I bought a box of ice cream sandwiches from Wal-Mart and bought fat free cool whip.  Sorry I forgot to add the magic shells and oreos in the picture.

I unwrapped each sandwich and stacked them in 3's on top of each other, criss-crossing the layout.  Note:  Be quick putting this together as the ice cream melts pretty quickly.

Once you have all of them stacked, spread whip cream over the entire thing.

Drizzle with the chocolate Magic Shell.

 Follow it up with the caramel Magic Shell.

Sprinkle crushed up oreos on top and wa-lah!  Homemade Ice Cream Cake!!!

Feel free to add whatever toppings you want on the cake like m&m's, cherry, strawberries, sprinkles, whatever your heart desires.  My kids and I did eat this and it was pretty good for homemade.  A bit sweet for me.  Personally, I can be happy with just vanilla ice cream and chocolate magic shell.  Sometimes I actually can be simple.  ;-)

Hope you enjoyed!


Party linking here:  Making the World Cuter       The DIY Showoff        More the Merrier Monday       Monday Funday       Two Cup Tuesday         Handmade Tuesday         The Tuesday Scoop      Tuesday’s Treasures        Nifty Thrifty Tuesday        A Peek into my Paradise